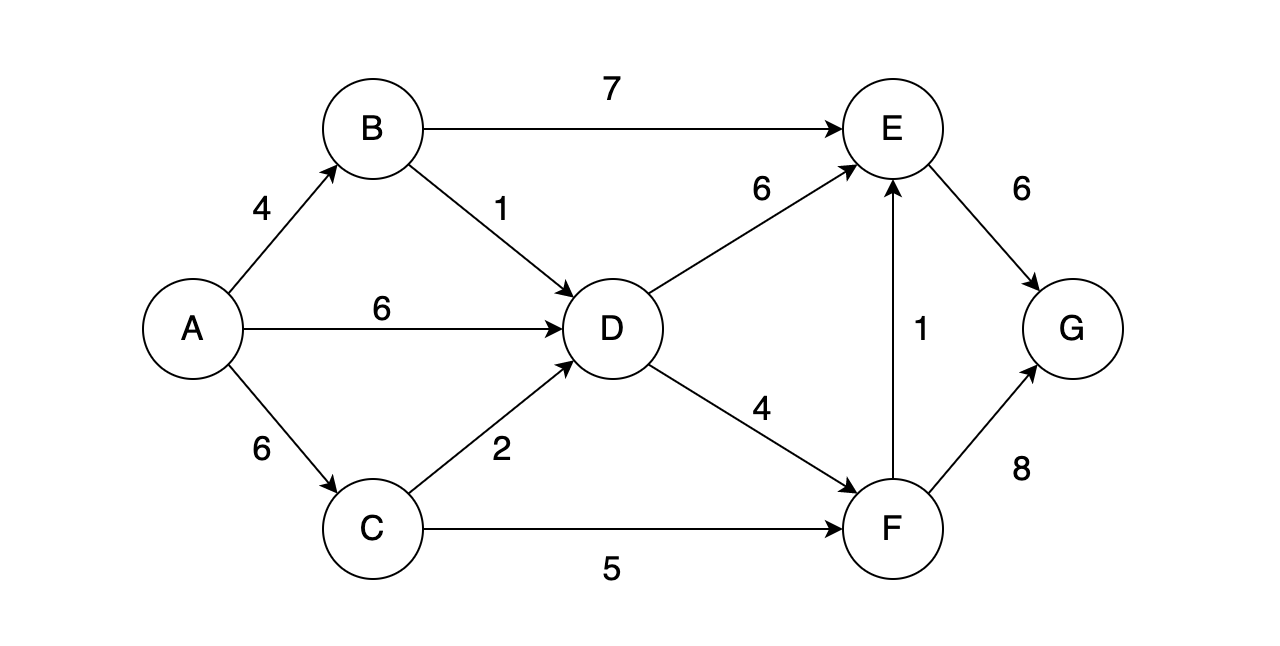
图的定义
什么是图
在计算机科学中,图是一种抽象数据类型,用于实现数学中图论的无向图和有向图的概念。 图的数据结构包含一个有限的集合作为节点集合,以及一个无序对或有序对的集合作为边的集合。节点可以是图结构的一部分,也可以是用整数下标或引用表示的外部实体。 图的数据结构还可能包含和每条边相关联的数值,例如一个标号或一个数值。
邻接矩阵
邻接矩阵是一种方阵,用来表示有限图。它的每个元素代表各点之间是否有边相连。它是图的另一种矩阵表示方式,它的元素表示各个节点-边对是否相关。还有图的度数矩阵,含有每个结点的度数信息。
无向图
无向图解释 直观来说,若一个图中每条边都是无方向的,则称为无向图。无向图的邻接矩阵计算方法是每条边为对应的单元加上1,而每个自环加上2。这样让某一节点的度数可以通过邻接矩阵的对应行或者列求和得到。
有向图
对于有向图,其每条边都有方向,泽被称为有向图
有向图的邻接矩阵可以是不对称的。我们可以定义有向图的邻接矩阵中的某个元素$A_{ij}$代表:
- 从i指向j的边的数目
- 从j指向i的边的数目
带权有向图
顾名思义,就是带权值的有向图,其邻接矩阵中的某个元素$A_{ij}$代表:
- 从i指向j的边的权值
- 从j指向i的边的权值
图的创建及增删
在本文中,我们将完成一下带权有向图的创建及增删:

Graph类属性定义
在 Graph类中,我们需要定义如下属性,以表示一个带权有向图:
- 节点
- 邻接矩阵
同时,为了方便转换,我们定义了两个Map,实现节点与矩阵索引的快速转换,最终,节点的属性如下:
public class Graph {
    private Map<String, Integer> vertex2Index;          // 节点到索引的转换Map
    private Map<Integer, String> index2Vertex;          // 索引到节点的转换Map
    private Set<String> vertex;                         // 节点Set
    private int maxIndex;                               // 最大索引
    private ArrayList<ArrayList<Integer>> adjacent;     // 邻接矩阵
}
插入节点
对于插入节点,我们需要进行以下操作:
- 插入节点
扩大矩阵
- 添加列
- 添加行
- 更新查找Map
实现代码:
public boolean addVertex(String vertex) {
    if (this.vertex.contains(vertex)) {
        return false;
    }
    this.vertex.add(vertex);
    maxIndex++;
    this.vertex2Index.put(vertex, maxIndex);
    this.index2Vertex.put(maxIndex, vertex);
    // 扩大邻接矩阵
    // 列
    for (ArrayList<Integer> list : this.adjacent) {
        list.add(0);
    }
    // 行
    this.adjacent.add(new ArrayList<>(10));
    for (int i = 0; i < this.adjacent.size(); i++) {
        this.adjacent.get(this.adjacent.size() - 1).add(0);
    }
    return true;
}
删除节点
对于删除节点,我们需要进行以下操作:
更新邻接矩阵
- 删除行
- 删除列
- 更新查找Map
- 删除节点
实现代码:
public boolean delVertex(String vertex){
    // 校验是否存在
    if (!this.vertex.contains(vertex)) {
        return false;
    }
    int index = this.vertex2Index.get(vertex);
    // 删除行
    this.adjacent.remove(index);
    // 删除列
    for(ArrayList<Integer> list:this.adjacent){
        list.remove(index);
    }
    // 索引调整
    for (int i = index; i < maxIndex; i++) {
        this.index2Vertex.put(index,this.index2Vertex.get(index+1));
    }
    // 删除节点
    this.index2Vertex.remove(maxIndex);
    maxIndex--;
    this.vertex2Index.remove(vertex);
    this.vertex.remove(vertex);
    return true;
}
添加&删除边
添加边的操作,实际上就是更新邻接矩阵的操作
实现代码:
// 插入边
public boolean addAdjacent(String from, String to, int weight) {
    // 判断是否存在
    if (!(this.vertex.contains(from) && this.vertex.contains(to))) {
        return false;
    }
    // 设置邻接矩阵
    this.adjacent.get(this.vertex2Index.get(from)).set(this.vertex2Index.get(to), weight);
    return true;
}
// 删除边
public boolean delAdjacent(String from, String to) {
    // 判断是否存在
    if (!(this.vertex.contains(from) && this.vertex.contains(to))) {
        return false;
    }
    // 设置邻接矩阵
    this.adjacent.get(this.vertex2Index.get(from)).set(this.vertex2Index.get(to), 0);
    return true;
}
测试一下
至此,我们已经完成了一个图的创建和增删的相关操作,测试一下:
package org.kakkk.graph;

public class Main {
    public static void main(String[] args) {
        Graph graph = new Graph();

        graph.addVertex("A");
        graph.addVertex("B");
        graph.addVertex("C");
        graph.addVertex("D");
        graph.addVertex("E");
        graph.addVertex("F");
        graph.addVertex("G");
        graph.addVertex("H");

        graph.addAdjacent("A","B",4);
        graph.addAdjacent("A","D",6);
        graph.addAdjacent("A","C",6);
        graph.addAdjacent("B","E",7);
        graph.addAdjacent("B","D",1);
        graph.addAdjacent("C","D",1);
        graph.addAdjacent("C","F",5);
        graph.addAdjacent("D","E",6);
        graph.addAdjacent("D","F",4);
        graph.addAdjacent("E","G",6);
        graph.addAdjacent("F","E",1);
        graph.addAdjacent("F","G",8);

        graph.showAdjacent();
        System.out.println("=========================");
        graph.delVertex("D");
        graph.showAdjacent();
        System.out.println("=========================");
        graph.delAdjacent("E","G");
        graph.showAdjacent();
    }
}
输出:
[0, 4, 6, 6, 0, 0, 0, 0]
[0, 0, 0, 1, 7, 0, 0, 0]
[0, 0, 0, 1, 0, 5, 0, 0]
[0, 0, 0, 0, 6, 4, 0, 0]
[0, 0, 0, 0, 0, 0, 6, 0]
[0, 0, 0, 0, 1, 0, 8, 0]
[0, 0, 0, 0, 0, 0, 0, 0]
[0, 0, 0, 0, 0, 0, 0, 0]
=========================
[0, 4, 6, 0, 0, 0, 0]
[0, 0, 0, 7, 0, 0, 0]
[0, 0, 0, 0, 5, 0, 0]
[0, 0, 0, 0, 0, 6, 0]
[0, 0, 0, 1, 0, 8, 0]
[0, 0, 0, 0, 0, 0, 0]
[0, 0, 0, 0, 0, 0, 0]
=========================
[0, 4, 6, 0, 0, 0, 0]
[0, 0, 0, 7, 0, 0, 0]
[0, 0, 0, 0, 5, 0, 0]
[0, 0, 0, 0, 0, 6, 0]
[0, 0, 0, 1, 0, 8, 0]
[0, 0, 0, 0, 0, 0, 0]
[0, 0, 0, 0, 0, 0, 0]
图的遍历
深度优先(DFS)
整体思路如下:
- 先从一个初始节点开始深度优先查找
- 然后找到该节点的第一个邻接节点,找到则继续深度优先查找
- 如果找不到,则会回溯:那么尝试该节点的其他路径是否可以连通。
- 直到回溯到最顶层,然后退出该次深度优先查找函数。 挑选下一个初始节点如果没有访问过,则调用深度优先函数
对于深度优先算法,这里举一个简单的例子:

其遍历顺序为:A -> B -> E -> D -> C 或 A -> B -> E -> C -> D
广度优先(BFS)
- 首先以一个未被访问过的顶点作为起始顶点,访问其所有相邻的顶点;
- 然后对每个相邻的顶点,再访问它们相邻的未被访问过的顶点;
- 直到所有顶点都被访问过,遍历结束。
同样,对于广度优先算法,这里举个例子:

广度优先遍历顺序:A -> B -> C -> E -> D
具体实现
前面讲完了原理,我现在来实现一下
共用方法
// 获取第一个相邻的节点
public int getFirstNeighbor(int index) {
    for (int i = 0; i < this.vertex.size(); i++) {
        if (adjacent.get(index).get(i) > 0) {
            return i;
        }
    }
    return -1;
}
// 获取相邻的节点的下一个相邻节点
public int getNextNeighbor(int from, int to) {
    for (int i = to + 1; i < this.vertex.size(); i++) {
        if (adjacent.get(from).get(i) > 0) {
            return i;
        }
    }
    return -1;
}
DFS
public void dfs(boolean[] isVisited, int index) {
    System.out.print(this.index2Vertex.get(index));
    isVisited[index] = true;
    int w = getFirstNeighbor(index);
    while (w != -1) {
        if (!isVisited[w]) {
            dfs(isVisited, w);
        }
        w = getNextNeighbor(index, w);
    }
}
public void dfs() {
    boolean[] isVisited = new boolean[vertex.size()];
    for (int i = 0; i < getNumOfVertex(); i++) {
        if (!isVisited[i]) {
            dfs(isVisited, i);
        }
    }
    System.out.println();
}
BFS
public void bfs(boolean[] isVisited, int index) {
    int headIndex;
    int w;
    LinkedList<Integer> queue = new LinkedList<>();
    System.out.print(this.index2Vertex.get(index));
    isVisited[index] = true;
    queue.add(index);
    while (!queue.isEmpty()) {
        headIndex = queue.removeFirst();
        w = getFirstNeighbor(headIndex);
        while (w!=-1&&!isVisited[w]) {
            System.out.print(this.index2Vertex.get(w));
            isVisited[w] = true;
            queue.add(w);
            w = getNextNeighbor(headIndex, w);
        }
    }
}


public void bfs() {
    boolean[] isVisited = new boolean[vertex.size()];
    for (int i = 0; i < getNumOfVertex(); i++) {
        if (!isVisited[i]) {
            bfs(isVisited, i);
        }
    }
    System.out.println();
}
测试一下
测试代码:
public class Main {
    public static void main(String[] args) {
        Graph graph = new Graph();

        graph.addVertex("A");
        graph.addVertex("B");
        graph.addVertex("C");
        graph.addVertex("D");
        graph.addVertex("E");

        graph.addAdjacent("A","B",1);
        graph.addAdjacent("A","C",1);
        graph.addAdjacent("B","E",1);
        graph.addAdjacent("C","D",1);
        graph.addAdjacent("D","B",1);
        graph.addAdjacent("E","A",1);
        graph.addAdjacent("E","D",1);

        graph.dfs();
        graph.bfs();
    }
}
输出:
ABEDC
ABCED